
The kitchen is the most expensive room in most Indian homes to fit out, and the one where a small hardware decision quietly moves your total by tens of thousands of rupees. If you've read our BOQ guide, you already know the kitchen is where overruns happen most often. This is the deep dive on why, room by room, decision by decision.
We break it down by the decisions that actually move cost and longevity: layout, modular versus carpentry built, hardware tiers, board material, and the placement mistakes that are cheap to avoid before installation and expensive to fix after.
Layout Types: What Actually Fits Your Space
Before hardware or finish, layout decides how the kitchen works day to day. Three layouts cover most Indian apartments.
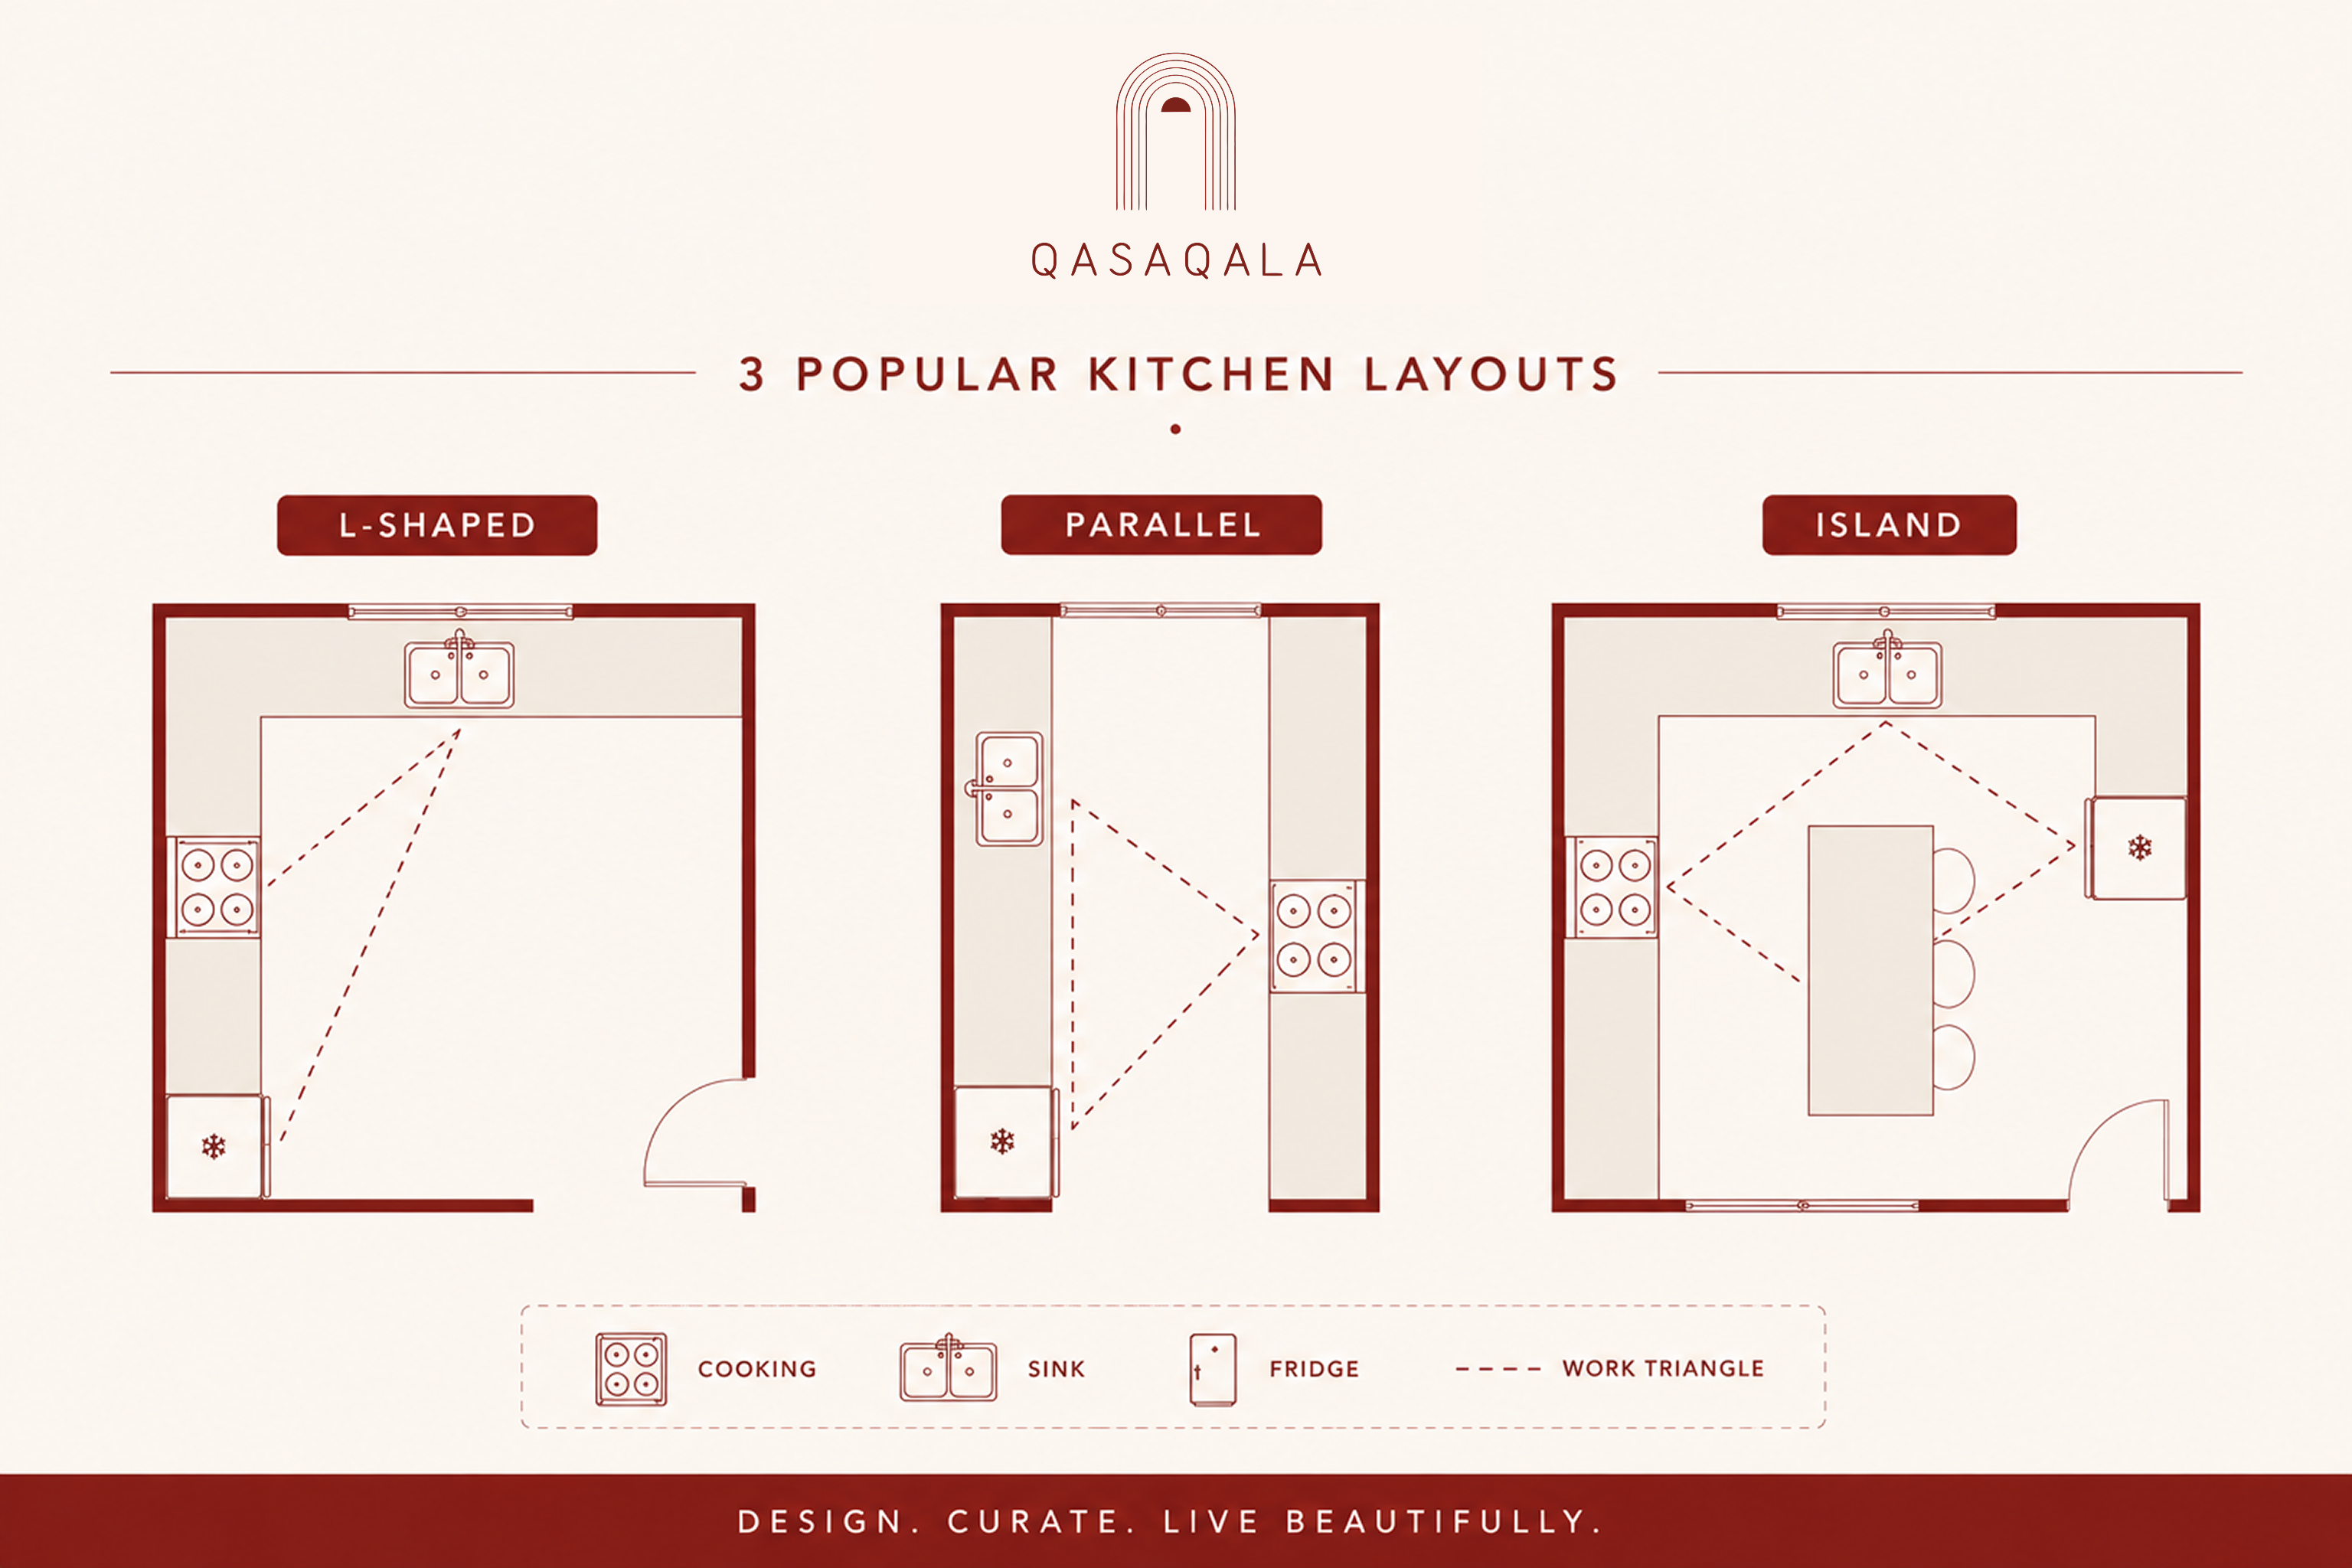
L-shaped: The most common layout for 2BHK and 3BHK apartments in India. Works well when the kitchen has two adjacent walls of reasonable length, gives you a natural work triangle between stove, sink, and fridge, and leaves floor space free for a small dining nook or utility access.
Parallel (galley): Two facing counters, common in narrower kitchens where an L-shape would leave one arm too short to be useful. Efficient for cooking since everything is within reach, but needs at least 4 feet of clearance between counters or it feels cramped with two people in it.
Island: Rare in Indian apartments below 2,000 sq.ft simply because there isn't room, but shows up in larger 3BHK and 4BHK layouts. An island adds prep space and can double as a breakfast counter, but it only works if the kitchen is wide enough that it doesn't block the main work triangle.
On kitchen size
Most 2BHK kitchens in India fall between 80 and 120 sq.ft. If yours is on the smaller end, an L-shape will almost always outperform a parallel layout for storage, even though parallel looks more efficient on paper.
Modular vs Carpentry Built: The Real Tradeoff
This decision affects both your BOQ and your timeline more than almost any other kitchen choice.
Modular kitchens are built from factory made, standardized cabinet boxes assembled on site. Faster to install (typically 15 to 20 days versus 30 to 45 for full carpentry), more consistent finish quality since the boxes are machine cut, and easier to get accurate warranty terms on since the hardware and boxes come from a defined manufacturer.
Carpentry built kitchens are constructed on site by a carpenter, board by board. More flexible for odd shaped kitchens or non standard dimensions, but quality depends entirely on the individual carpenter's skill, and site built joints are more prone to inconsistency over time, especially in humid conditions.
For most apartment kitchens with standard dimensions, modular is the better default. Carpentry built earns its cost and time premium mainly in kitchens with awkward angles, low headroom under beams, or highly custom storage needs that a modular catalog can't accommodate.
Hardware Tiers: What You're Actually Paying For
This is the section worth reading twice, because this is where vendor quotes stop being comparable at a glance. Two kitchens quoted at different per sq.ft rates can look identical in a render and be built from completely different hardware underneath.
Top Shelf Mechanisms
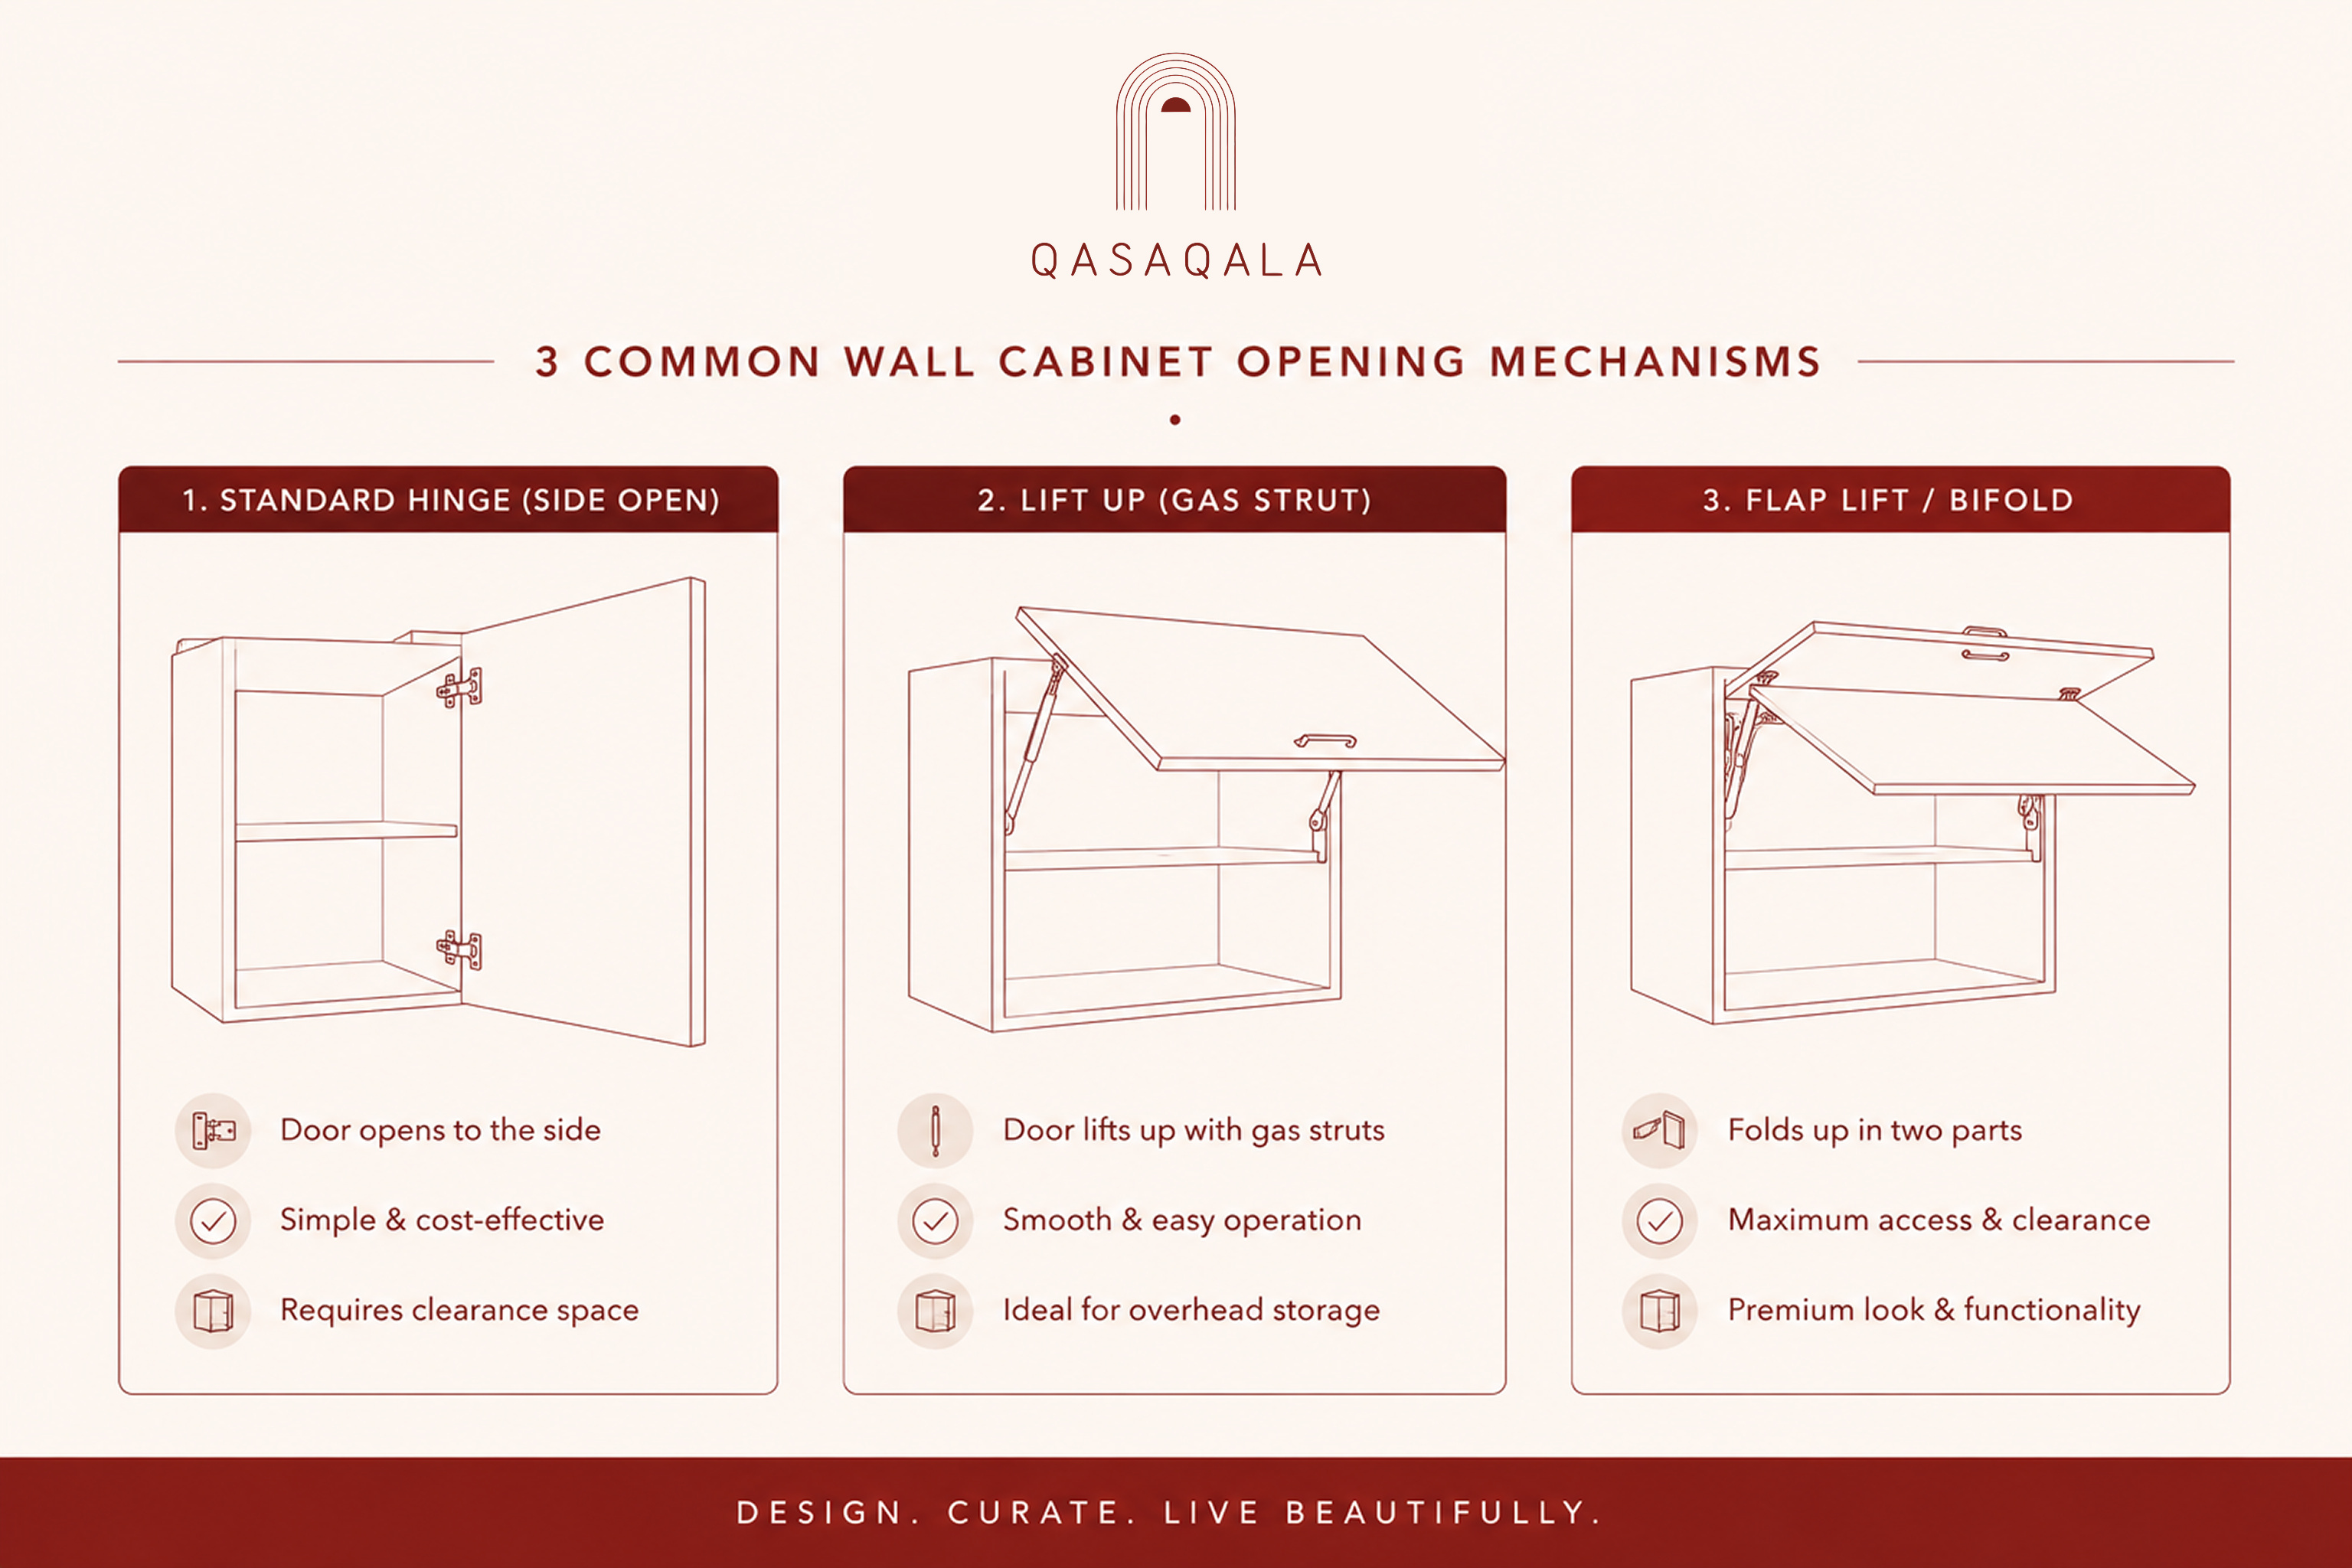
Budget tier: Standard hinged opening, top shelves that swing open on a simple hinge. Functional, but shelves at the very top of a tall unit can be hard to reach and awkward to hold open with one hand while you reach in with the other.
Mid tier: Lift up mechanisms with gas struts, the shelf lifts and stays open on its own, easier to use one handed.
Premium tier: Flap lift and bifold systems, often called Euro style. The shutter folds or lifts in a way that clears headroom entirely, common in taller units and increasingly popular in Indian kitchens with false ceilings that lower usable height. These cost meaningfully more per unit but solve a real ergonomics problem in taller cabinet runs.
Basket and Drawer Systems
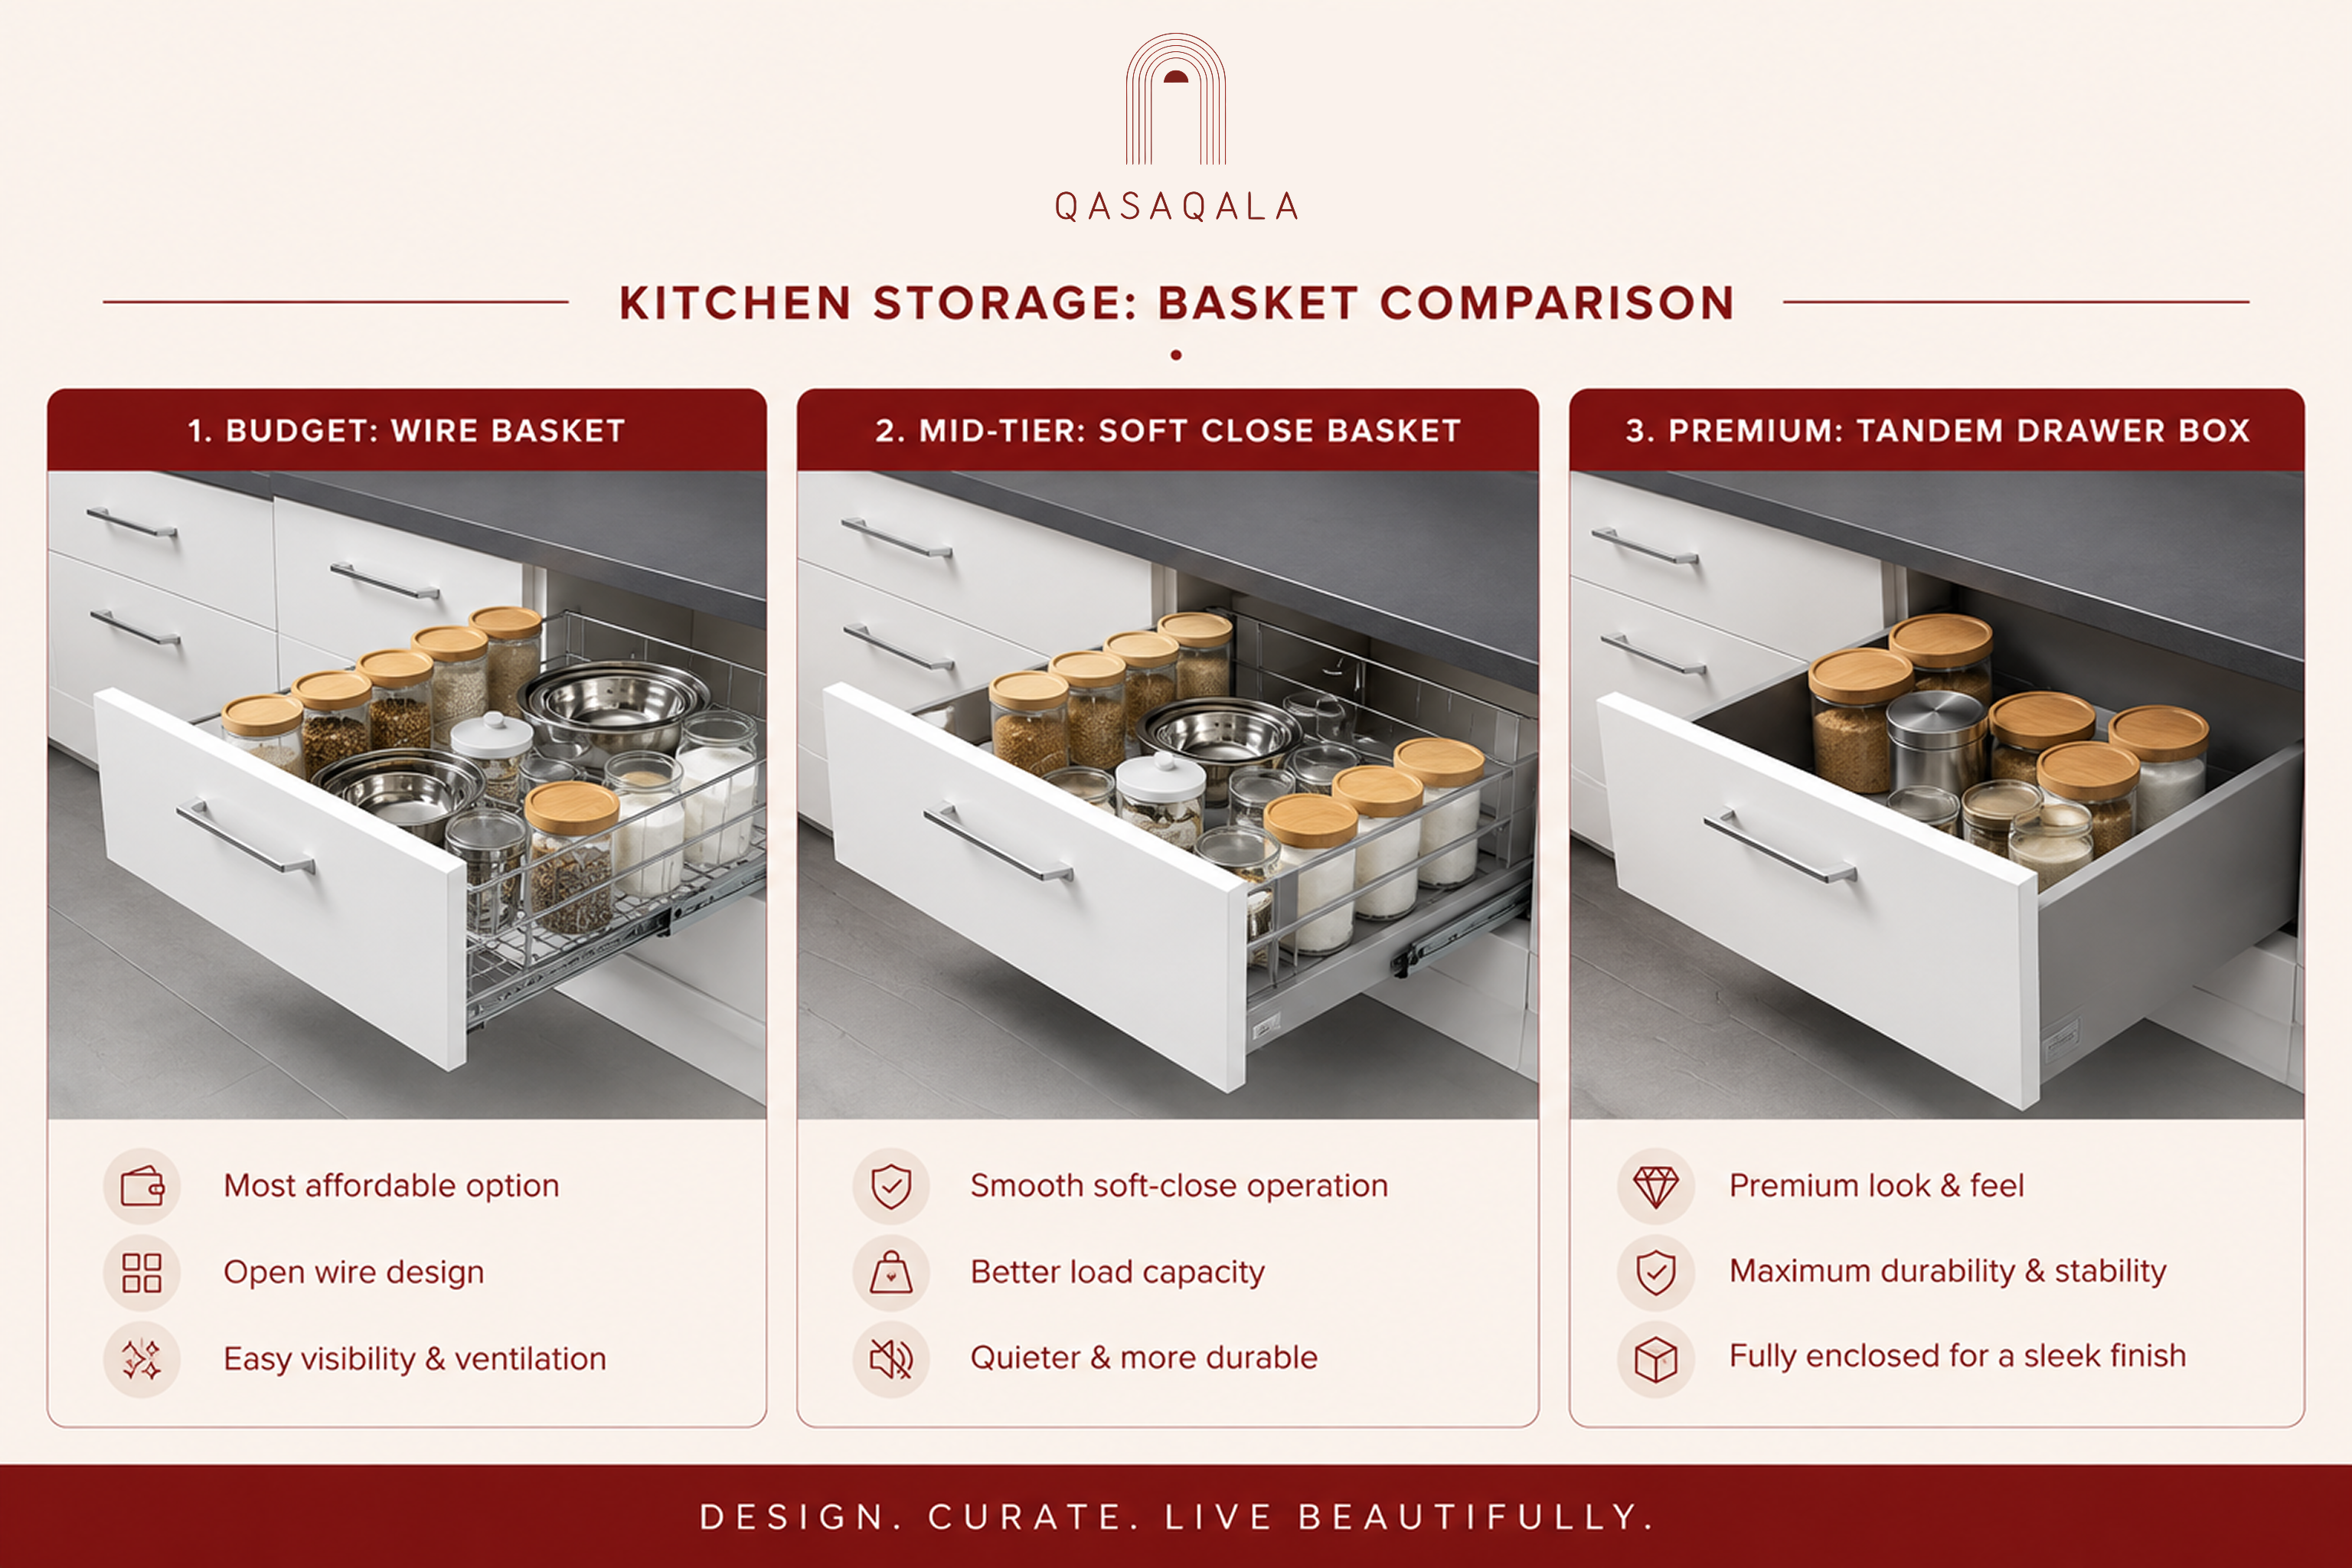
Budget tier: Plain, plate, and cup-saucer baskets with acrylic coated wire fascia and standard telescopic channels. These work, but the wire coating tends to wear and channels can loosen over years of daily use.
Mid tier: Better quality channels with soft close dampers added to standard baskets, a noticeable upgrade in daily feel for a moderate cost increase.
Premium tier: Tandem box drawer systems and solid bottom pull outs. Instead of wire baskets, you get fully enclosed drawer boxes with soft close on every drawer, better weight capacity, and a cleaner look when opened. This is one of the highest perceived-value upgrades in a kitchen, since it's visible every single day, but it's also one of the most commonly upsold items, worth confirming you actually need it in every drawer versus just the ones you use most.
Upgrading baskets and drawer systems mid project, after your BOQ is already signed, is exactly the kind of 'just one upgrade' moment that inflates the kitchen line item by 15 to 20 percent. Decide your tier before signing, not during installation.
Board Material: MDF vs Ply
This is the single most consequential and most poorly understood spec in an Indian kitchen quote, because it affects both cost and how long the kitchen actually lasts.
MDF (Medium Density Fibreboard): Smoother finish, takes paint and PU finishes better, generally the cheaper option. The tradeoff is moisture resistance. MDF swells if water sits on it, which matters in a room that deals with spills and steam daily.
Plywood (BWR grade): Boiling Water Resistant plywood, a step up in moisture handling, reasonable mid tier default for most Indian kitchens.
Plywood (BWP or Marine grade): Boiling Water Proof or marine grade plywood, the most moisture resistant option, meaningfully more expensive, but the right call for the base cabinets directly under the sink and any unit that regularly sits near water or steam.
Where to upgrade
You don't need marine ply for every cabinet in the kitchen. The single highest value place to spend on board upgrade is the sink base unit and any cabinet below a wet zone. Everywhere else, BWR ply is normally a fair middle ground between cost and durability.
Chimney and Hob Placement Mistakes
Two mistakes show up repeatedly in Indian kitchen fitouts, both cheap to avoid before installation and expensive to fix after.
Chimney duct routing decided too late. The chimney needs a clear path to an external wall or shaft. If this isn't planned before the false ceiling and cabinet layout are finalized, you end up either compromising duct length (which reduces suction efficiency) or boxing in an ugly visible duct run. Confirm the duct path before the false ceiling design is locked, not after.
Hob positioned too close to a window with active airflow. A hob directly under an operable window looks good in a render, but a cross breeze can affect flame stability on gas hobs, and rain ingress is a real problem if the window is left open while cooking. If a window sits above or beside your hob, plan for it to stay closed during cooking or budget for a sill high enough to prevent splash.
What to Check Before You Finalize
A short list to run through before you sign off on your kitchen quote:
- Board material specified separately for wet zone cabinets versus dry storage, not one blanket spec for the whole kitchen
- Basket and drawer tier confirmed per unit, not assumed uniform across the kitchen
- Top shelf mechanism specified for units above eye level, not left as a default
- Chimney duct path confirmed against the false ceiling plan
- Hardware brand and warranty terms named specifically, not just 'branded hardware' as a line item
- Countertop material and edge finish specified, since this is a separate cost line often bundled loosely into 'kitchen' as one number
The Bottom Line
Two kitchen quotes at different prices are rarely apples to apples. Once you know what top shelf mechanism, basket system, and board grade you're actually paying for, a kitchen BOQ stops being a single number to negotiate down and becomes a checklist you can compare vendor to vendor, tier to tier.
See it in your actual room
Upload your floor plan and see any flooring type rendered in your own space - before ordering a single tile.
Try QasaQala free